 Pin
Pin My first katsu happened at a tiny izakaya tucked between two office buildings in Tokyo, where the cook seemed to have perfected the art of frying in a space barely larger than a closet. The cutlet arrived on a chipped ceramic plate with a sound that made me pause—that unmistakable crackle when your fork broke through the panko crust, releasing a whisper of steam. Years later, I realized I could recreate that exact moment in my own kitchen, and somehow it tastes even better when you know the secret is patience and the right temperature.
I made this for my roommate one Tuesday evening when she came home stressed about work, and watching her face when she bit into that golden cutlet—the way her eyes closed for just a second—reminded me that sometimes the simplest dishes carry the most comfort. We ate it straight from the skillet with our hands, standing at the counter with rice bowls, barely talking, which said everything.
Ingredients
- Boneless, skinless chicken breasts (4 pieces, about 150 g each): Pound them to an even half-inch thickness so they cook uniformly and stay tender inside while the outside crisps up beautifully.
- Salt and black pepper: These humble seasonings do the heavy lifting before the breading, so don't skip this step or your katsu will taste flat.
- All-purpose flour (1/2 cup): The flour acts as an adhesive layer that helps the egg and panko bond to the chicken, creating that sealed, crackling crust.
- Large eggs (2) and water (1 tablespoon): The water loosens the egg wash slightly so it coats more evenly without creating thick clumps of egg white.
- Panko breadcrumbs (1 1/2 cups): Panko is coarser than regular breadcrumbs, which is exactly why it fries up with those gorgeous, delicate shards instead of a dense coating.
- Vegetable oil (1 cup for shallow frying): You want enough oil to come halfway up the cutlet as it fries, creating an even golden exterior on both sides.
- Ketchup (1/4 cup): The tomato base gives the sauce body and natural sweetness that balances the umami elements.
- Worcestershire sauce (2 tablespoons): This adds depth and a slight tang that traditional tonkatsu sauce is known for, though it's subtle if you're not looking for it.
- Soy sauce (1 tablespoon): Just enough to add savory backbone without making the sauce taste primarily salty.
- Mirin (1 tablespoon, or honey as substitute): Mirin brings a delicate sweetness and silky texture that honey can approximate in a pinch, though the flavor leans slightly different.
- Dijon mustard (1 teaspoon): A small amount adds complexity and a whisper of sharpness that keeps the sauce from feeling one-dimensional.
- Sugar (1 teaspoon): This rounds out the sweetness and helps balance the salty-savory elements in the sauce.
- Shredded cabbage, lemon wedges, and steamed rice (optional but recommended): The cool, crisp cabbage provides textural contrast, the lemon brightens the richness, and rice soaks up every drop of sauce.
Tired of Takeout? 🥡
Get 10 meals you can make faster than delivery arrives. Seriously.
One email. No spam. Unsubscribe anytime.
Instructions
- Pound the chicken to an even thickness:
- Place each breast between two sheets of plastic wrap and use a meat mallet or rolling pin to gently tap it to about half an inch thick. This ensures even cooking and keeps the meat tender instead of drying out in patches.
- Season both sides generously:
- Sprinkle salt and pepper on both sides and let the seasoning sit for a minute so it adheres to the surface rather than sliding off into the oil.
- Set up your breading station like an assembly line:
- Arrange three shallow dishes in a row: flour in the first, egg wash (beaten eggs plus water) in the second, and panko in the third. This setup prevents confusion mid-fry and makes the process smooth.
- Flour, then egg, then panko:
- Dredge each cutlet in flour, tapping off excess so it's lightly coated rather than caked. Dip it into the egg wash, let excess drip back, then press it into the panko, making sure every surface gets covered and the breadcrumbs are pressed gently but firmly to stick.
- Heat your oil to the right temperature:
- Pour oil into a large skillet and heat over medium heat until it shimmers slightly and a breadcrumb sizzles immediately when dropped in (around 170°C or 340°F). Too cool and the coating absorbs oil instead of crisping; too hot and it burns before the chicken cooks through.
- Fry the cutlets until golden on both sides:
- Carefully lay each breaded cutlet in the hot oil and let it cook undisturbed for 3 to 4 minutes until the bottom turns deep golden brown, then flip and fry the other side for another 3 to 4 minutes. The chicken is done when it's golden outside and reaches an internal temperature of 165°F (74°C).
- Drain on a rack, not paper towels, if possible:
- A wire rack allows air to circulate underneath and keeps the bottom from getting soggy from steam and oil. If you only have paper towels, place them on a baking sheet and drain your cutlets standing upright against the edges rather than lying flat.
- Whisk together the tonkatsu sauce components:
- In a small bowl, combine ketchup, Worcestershire sauce, soy sauce, mirin, mustard, and sugar, whisking until completely smooth with no streaks of ketchup remaining.
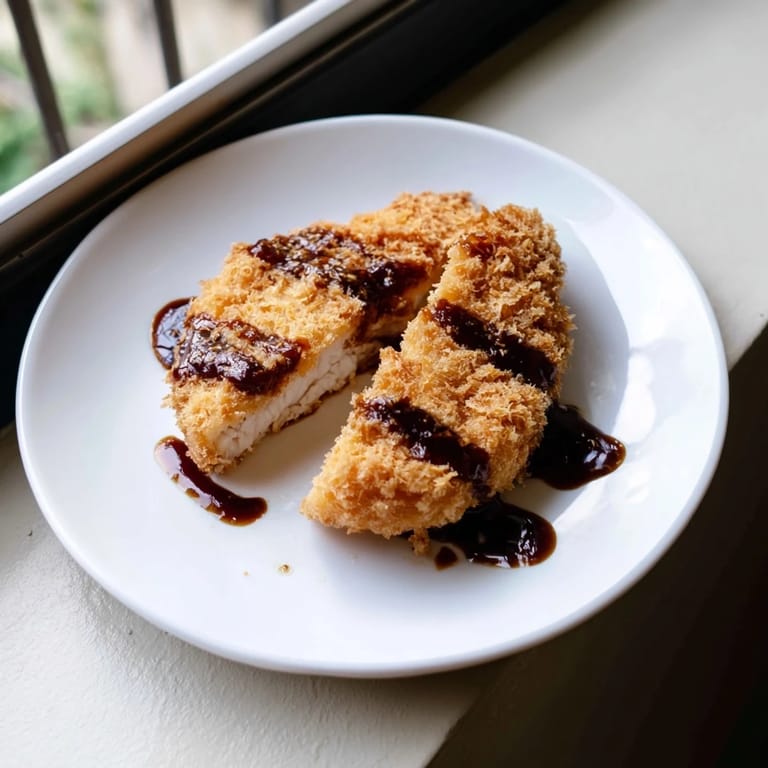
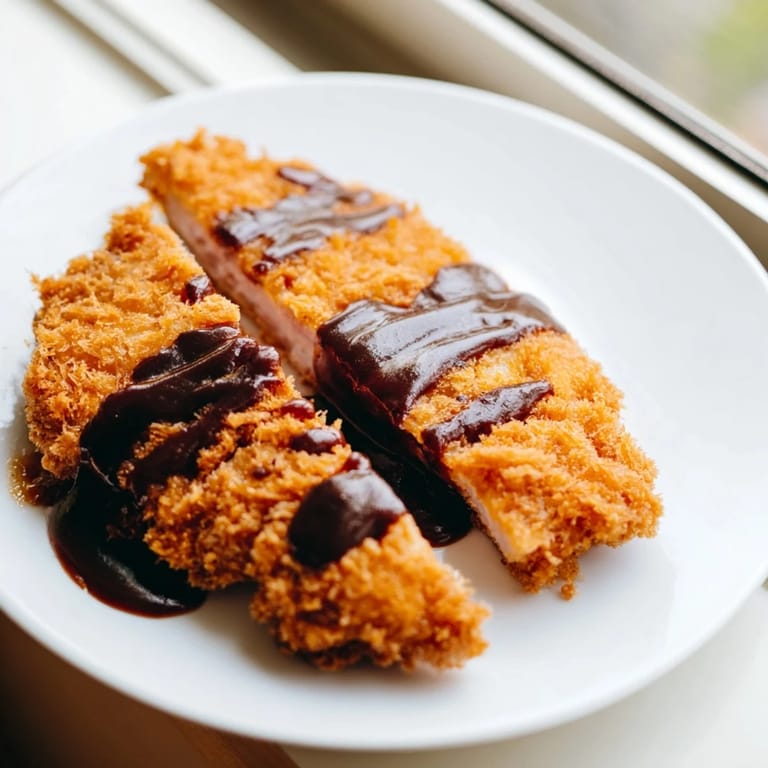
- Slice and serve immediately:
- Cut the drained cutlets into strips, arrange them on a plate with shredded cabbage and lemon wedges on the side, drizzle sauce over the chicken, and serve with steamed rice if you like.
 Pin
Pin There's a specific moment when someone takes that first bite of katsu you've made—a moment where they stop thinking about the day and just exist in the crunch and the steam and the sauce. That's when I realized this recipe isn't just about replicating restaurant food at home; it's about creating those small, golden pauses in someone else's day.
The Panko Advantage
Regular breadcrumbs are fine, but panko is the reason Japanese fried foods have that signature texture that feels delicate despite being fried. Panko breadcrumbs are coarser and less dense, which means they fry up with air pockets between them instead of compacting into a solid crust. The result feels lighter on your tongue even though you're eating something that's been in hot oil, and that's honestly the entire charm of katsu. I've tried going back to regular breadcrumbs for budget reasons, and every time I'm reminded why it's worth spending the extra dollar for panko.
Why Homemade Tonkatsu Sauce Matters
Bottled tonkatsu sauce tastes like it's been sitting in a warehouse since last year, but when you whisk together the five components in your own bowl, something magical happens—the ketchup sweetness balances against the Worcestershire tang, the mirin adds silkiness, and the mustard keeps everything from being one-dimensional. The sauce takes less than three minutes to make, which is less time than the chicken takes to fry, and it tastes like you actually understand what you're doing. I started making extra sauce and keeping it in a jar in the fridge because it's good on grilled fish, roasted vegetables, or even scrambled eggs if you're feeling adventurous.
Making This Dish Your Own
The beauty of katsu is that once you master the breading and frying technique, you can apply it to almost anything—pork cutlets are the traditional version, but I've made it with turkey breast when chicken felt boring, and once with thick slices of eggplant for a vegetarian version that surprised even me. The sauce is flexible too; if you don't have mirin, honey works, though the sauce will taste slightly less refined. The fundamental technique—pound, season, bread, fry—is what matters, and once you feel confident with chicken, you can improvise with whatever looks good at the market.
- Pork cutlets take roughly the same cooking time and taste slightly richer, which pairs beautifully with the sweet-savory sauce.
- A squeeze of fresh lemon juice over the finished dish brightens everything and cuts through the richness of the fried coating.
- Serve this alongside a simple cucumber salad or pickled vegetables if you want something cool and crisp to balance the heat of the fried cutlet.
 Pin
Pin This is the kind of recipe that reminds you why you learned to cook in the first place—simple ingredients transformed into something golden and crispy and deeply satisfying, ready to eat in less than an hour. Make it once and you'll understand why it's a beloved dish across Japan and beyond.
Recipe Q&A
- → How do I achieve maximum crispiness?
For extra crispiness, let the breaded cutlets rest for 10 minutes in the refrigerator before frying. This allows the coating to set firmly. Additionally, ensure your oil reaches 340°F (170°C) before adding the chicken, and avoid overcrowding the pan which drops oil temperature.
- → Can I substitute pork for chicken?
Absolutely. Pork cutlets create a traditional tonkatsu variation. Use pork loin cut into thin cutlets, pound to even thickness, and follow the same breading and frying process. Cooking time remains the same—3 to 4 minutes per side.
- → What's the best way to pound the chicken evenly?
Place each chicken breast between two sheets of plastic wrap to prevent splashing. Use a meat mallet's flat side, pounding gently from the center outward to achieve uniform thickness of about 1/2 inch. This ensures even cooking and prevents dry spots.
- → How should I store leftovers?
Store cooled cutlets in an airtight container in the refrigerator for up to 3 days. Reheat gently in a 350°F oven for 8-10 minutes to restore crispiness, rather than microwaving which softens the coating.
- → What beverages pair well with this dish?
This crispy cutlet pairs wonderfully with cold Japanese lager beer, which refreshes the palate between bites. Green tea also complements the dish beautifully for a non-alcoholic option, balancing the richness of the fried coating.
- → Can I make the tonkatsu sauce ahead of time?
Yes, the tonkatsu sauce keeps well in the refrigerator for up to two weeks in a sealed jar. You can prepare it a day or two ahead, allowing flavors to meld. Simply stir before serving if separation occurs.